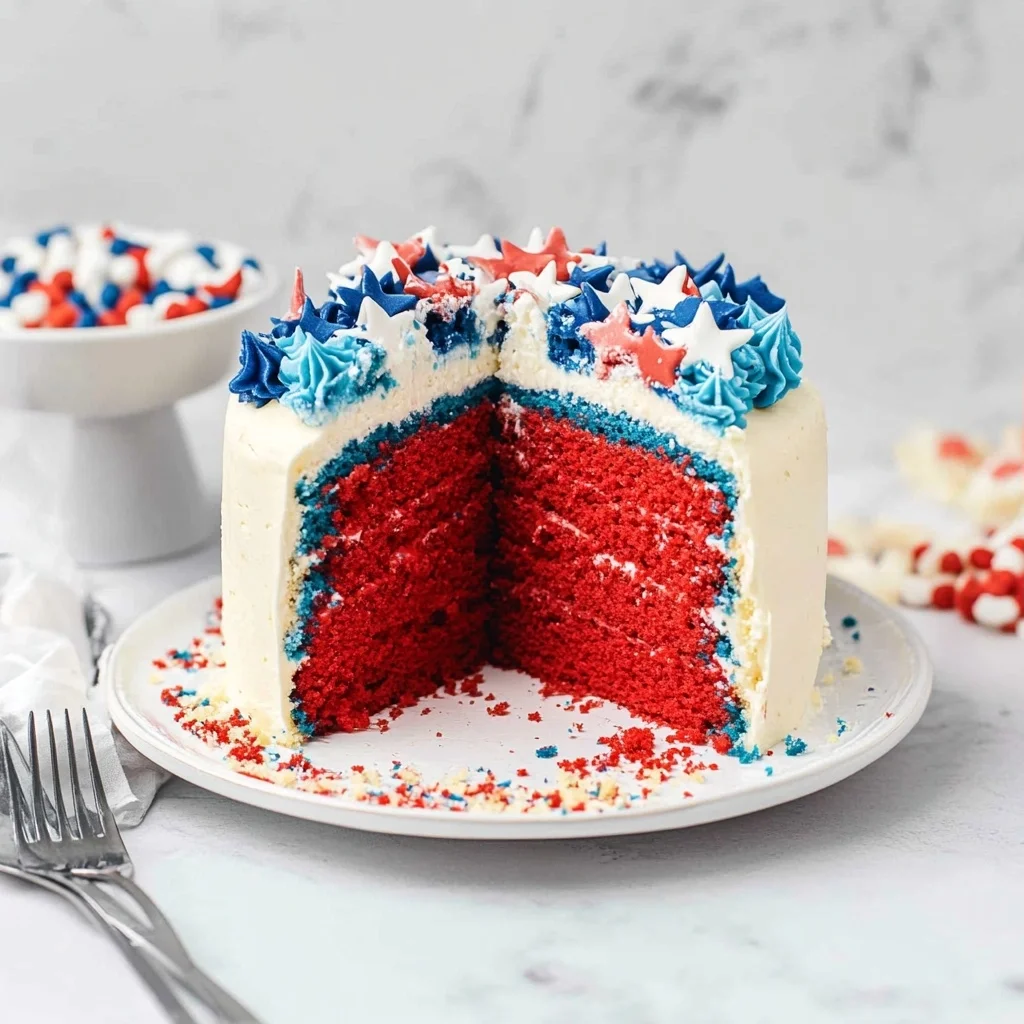
Red White and Blue Frosted Vanilla Cake: A Festive Delight
There’s something undeniably joyful about a slice of Red White and Blue frosted Vanilla Cake that makes every celebration feel extra special! Imagine a moist, fluffy vanilla cake topped with an eye-catching swirl of vibrant red and blue frosting, creating a feast for both the eyes and the palate. With each bite, you’ll experience a delightful combination of sweet, creamy, and festive flavors—all while sneaking in some protein goodness. I created this recipe during a busy week leading up to Independence Day when my family craved something festive yet nutritious, knowing it packs around 350 calories per slice.
The first time I made this cake was on a sunny July afternoon, just days before our annual backyard barbecue. My kids burst into the kitchen, their eyes lighting up at the colorful frosting swirling on top. “Can we eat it now?” my youngest exclaimed, practically bouncing on her toes! What sets this cake apart is the use of Greek yogurt in the frosting, giving it that creamy texture while boosting the protein content. The smiles on my family’s faces as they devoured their slices—with my husband asking for seconds—was all the confirmation I needed that this Red White and Blue frosted Vanilla Cake would become a cherished tradition in our home.
Ingredients for the Red White and Blue Frosted Vanilla Cake
Each ingredient in this dish plays an essential role in flavor and texture. Here’s what you’ll need:
- 2 cups all-purpose flour: Provides the structure and body for a light cake.
- 1 cup granulated sugar: Sweetens the cake while helping to create a tender crumb.
- 1 tbsp baking powder: Acts as a leavening agent to make the cake rise beautifully.
- 1 tsp salt: Enhances the sweetness and balances flavors in the cake.
- 1 cup whole milk (room temperature): Adds moisture and richness for a soft texture.
- 1/2 cup unsalted butter (softened): Contributes creaminess and flavor, making the cake rich.
- 2 large eggs (room temperature): Binds ingredients together while adding moisture and richness.
- 2 tsp vanilla extract: Infuses a delightful vanilla flavor that complements the cake.
- 1 cup unsalted butter (softened): Forms the base of a creamy, luscious frosting.
- 4 cups powdered sugar: Sweetens and thickens the frosting to achieve a perfect consistency.
- 1/4 cup whole milk: Helps achieve a smooth, spreadable frosting texture.
- 2 tsp vanilla extract: Adds an aromatic sweetness to elevate the frosting’s flavor.
- 1 cup red food coloring (for decoration): Creates a vibrant, festive hue for eye-catching decor.
- 1 cup blue food coloring (for decoration): Provides a striking contrast, enhancing the celebration theme.
Step-by-Step Instructions
I recommend starting by preheating your oven to 350°F (175°C) and greasing and flouring two 9-inch round cake pans. This step is essential because it ensures that your cakes won’t stick, making for an easier release later on. While the oven heats up, the pans will be ready for the batter, keeping everything on track for a timely bake.
Step 1: Preheat your oven to 350°F (175°C). Grease and flour two 9-inch round cake pans to prevent sticking. Make sure you cover the bottom and sides thoroughly; I find this helps avoid any surprises when you’re ready to remove the cakes from the pans later.
Step 2: In a large mixing bowl, combine 2 cups of all-purpose flour, 1 cup of granulated sugar, 1 tablespoon of baking powder, and 1 teaspoon of salt. Mixing these dry ingredients first helps evenly distribute the baking powder and salt throughout the flour. I usually whisk them together until well combined—you want to ensure every slice of your cake rises perfectly!
Step 3: Add in 1 cup of room temperature whole milk, 1/2 cup of softened unsalted butter, 2 large eggs (also at room temperature), and 2 teaspoons of vanilla extract to the dry mixture. Mix on medium speed until everything is well combined; this should take about 2-3 minutes. The goal is a smooth batter without lumps, which is crucial for achieving that perfect fluffy texture we all love in a vanilla cake.
Step 4: Carefully divide the batter evenly between the prepared cake pans. I recommend using a scale if you have one—this ensures both layers are equal in size and bake evenly. Smooth out the tops with a spatula for uniform baking.
Step 5: Bake in your preheated oven for about 25-30 minutes or until a toothpick inserted in the center comes out clean. Keep an eye on them; they should be golden brown on top and spring back lightly when touched. This visual cue ensures they’re baked through yet still moist inside.
Step 6: Once baked, allow the cakes to cool in their pans for about 10 minutes before transferring them to a cooling rack. This resting period helps set their structure, making it easier to handle them later. Afterward, let them cool completely before frosting; this prevents the frosting from melting off into a gooey mess.
Step 7: While the cakes are cooling, start preparing your frosting by beating 1 cup of softened unsalted butter in a mixing bowl until creamy. This step builds serious flavor and provides that rich base for your frosting—don’t rush it; it should take about 2-3 minutes on medium speed.
Step 8: Gradually add in 4 cups of powdered sugar along with 1/4 cup of whole milk while mixing until smooth and fluffy. I like to add the sugar slowly to avoid any cloud-like explosions! You want a nice consistency that’s spreadable but not too runny.
Step 9: After achieving that fluffy texture, mix in another teaspoon of vanilla extract until fully incorporated. The vanilla adds depth; trust me—it makes all the difference!
Step 10: Divide your frosting into two bowls—one will be colored red and the other blue using food coloring. Start with small amounts and add more as needed until you reach your desired vibrancy; I recommend wearing gloves during this step to avoid staining your hands!
Step 11: For assembly, place one cake layer on a serving plate and spread a generous layer of white frosting on top. Be sure to use an offset spatula for smooth edges—this makes all the difference in presentation! My family loves it when I add just enough frosting so they get that delightful creaminess with every bite.
Step 12: Carefully place the second cake layer on top and frost the entire top and sides with white frosting as well. Make sure you’re getting an even coat; this not only looks good but also provides a solid base for decorating later.
Step 13: Finally, decorate the top with red and blue frosting in whatever pattern you fancy! Whether you go for swirls or stripes, have fun with it—the vibrant colors make this cake perfect for celebrations!
What to Serve with Red White and Blue Frosted Vanilla Cake
This cake is already incredibly filling and balanced, but these sides add extra variety and nutrition to round out your meal perfectly.
Fresh Berry Salad: A refreshing mix of strawberries, blueberries, and raspberries tossed with a light honey-lime dressing brightens the palate after the rich sweetness of the cake. The tartness of the berries complements the vanilla frosting beautifully while providing a boost of antioxidants and vitamins C and K. This salad is a staple at our summer gatherings, offering a light contrast that keeps everyone feeling energized.
Garlic Herb Quinoa: Fluffy quinoa cooked with garlic and mixed herbs offers a hearty yet nutritious side that adds protein and fiber to your meal. Its nutty flavor profile pairs well with the sweet notes of the cake, creating a satisfying balance on your plate. My family loves making this quinoa as a meal prep option for busy weeks ahead; it’s easy to portion out and stays fresh for days.
Creamy Avocado Dip: This smooth avocado dip, seasoned with lime juice, garlic powder, and a hint of chili flakes, provides healthy fats that enhance the overall nutrition of your meal. The creaminess of the dip contrasts nicely with the cake’s texture while echoing its richness in a different form. We often serve it with whole grain tortilla chips as an appetizer before dessert during family celebrations.
Cornbread Muffins: Lightly sweetened cornbread muffins are fluffy bites that bring a comforting texture alongside your cake. Their subtle sweetness mirrors the vanilla flavors in the cake while offering complex carbohydrates that fuel your body post-celebration. These muffins are my go-to when we have guests over—they’re easy to whip up in advance and always disappear quickly!
Storage & Serving Tips
To store your Red White and Blue Frosted Vanilla Cake, keep it in an airtight container in the refrigerator, where it will stay fresh for up to 5 days. If you want to maintain the cake’s texture, consider storing the cake layers and frosting separately. Place the cake layers in a tightly sealed container, while the frosting can be stored in another airtight container. If you have leftover food coloring, store that separately as well to prevent any color mixing.
When reheating, the best method for restoring your cake is to use an oven. Preheat it to 350°F and warm individual slices for about 8-10 minutes until they are heated through. Avoid microwaving the cake, as this can make it mushy and detract from its delightful texture. For the frosting, if needed, you can re-whip it gently with a hand mixer after a brief stint at room temperature to bring it back to its fluffy consistency.
Pro tip: To batch cook this recipe for meal prep, consider doubling the ingredients for a week’s worth of treats. Portion out slices into individual containers so family members can grab their favorite piece easily throughout the week. For variety, swap in almond extract instead of vanilla or try a different food color for frosting; you could also add some shredded coconut on top for added texture. To keep your frosting at its best during storage, always seal it tightly and avoid letting it sit out too long before serving to keep that fresh flavor intact.
Conclusion

This Red White and Blue frosted Vanilla Cake has become a regular rotation recipe for me, and I find myself making it at least twice a month because it’s not only delicious but also delivers 350 calories per slice without any guilt. The secret to its standout flavor is the combination of whole milk and fluffy butter, which creates a moist and tender crumb that you won’t find in most vanilla cakes. Give this one a try this week. I promise it’ll become a regular in your house too.
Red White and Blue Frosted Vanilla Cake
Ingredients
Method
- Preheat the oven to 350°F (175°C). Grease and flour two 9-inch round cake pans.
- In a large mixing bowl, combine flour, sugar, baking powder, and salt.
- Add milk, butter, eggs, and vanilla extract to the dry ingredients. Mix on medium speed until well combined.
- Divide the batter evenly between the prepared cake pans.
- Bake for 25-30 minutes or until a toothpick inserted in the center comes out clean.
- Allow the cakes to cool in the pans for 10 minutes, then transfer to a cooling rack to cool completely.
- In a mixing bowl, beat the softened butter until creamy.
- Gradually add powdered sugar and milk, mixing until smooth and fluffy.
- Add vanilla extract and mix until combined.
- Divide the frosting into two bowls. Color one bowl with red food coloring and the other with blue food coloring.
- Place one cake layer on a serving plate. Spread a layer of frosting on top.
- Top with the second cake layer and frost the top and sides of the cake with white frosting.
- Decorate the top with red and blue frosting in a pattern of your choice.