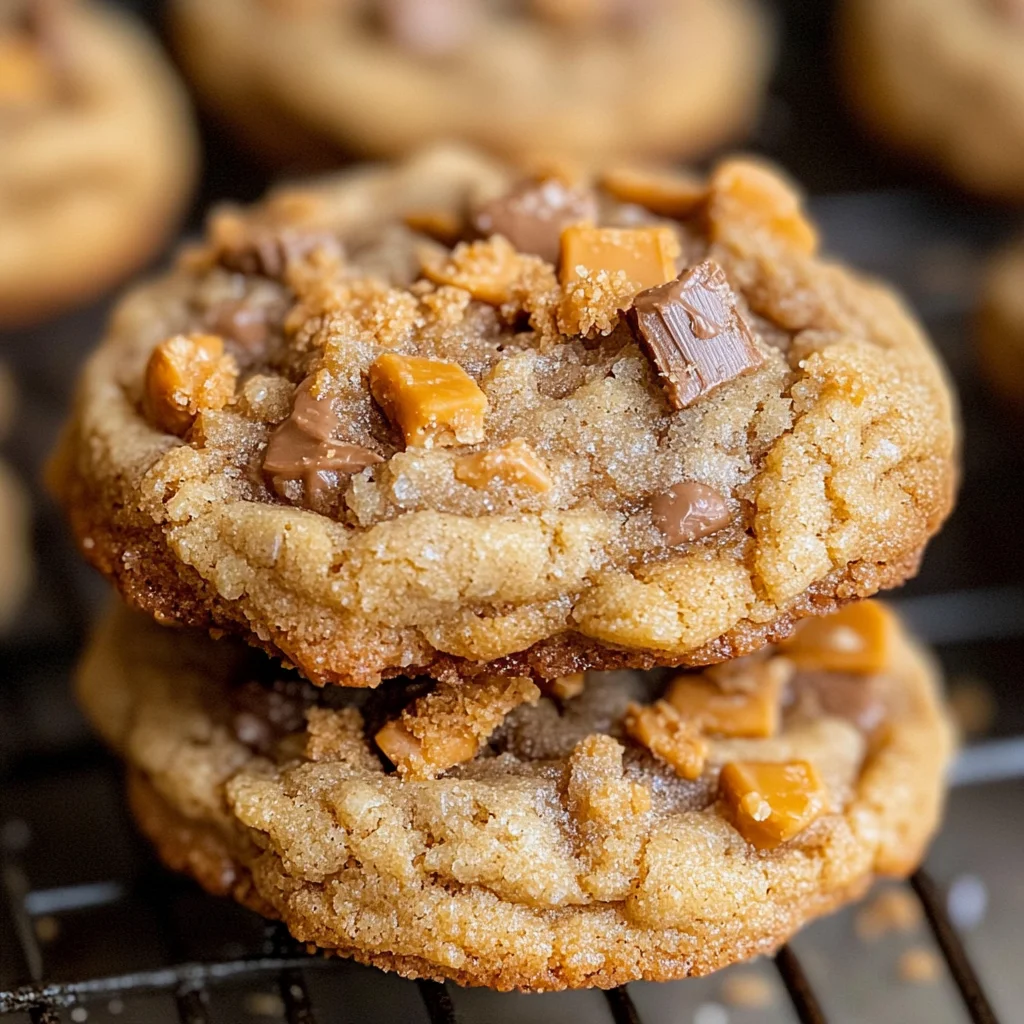
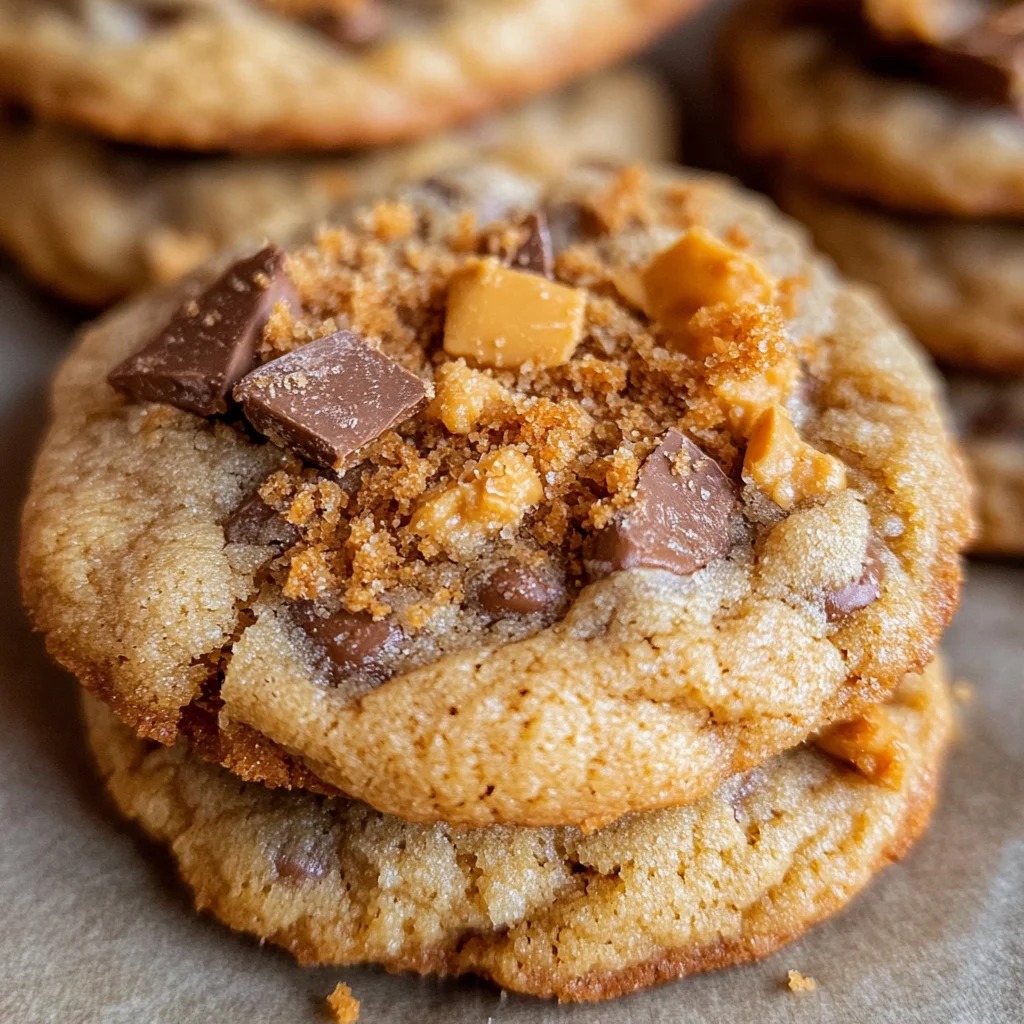
Peanut Butter Butterfinger Cookies
If you’re looking for a cookie that will make your taste buds dance, these Peanut Butter Butterfinger Cookies are the answer! Imagine biting into a thick, soft peanut butter cookie loaded with crunchy bits of Butterfinger. It’s like a dream come true for peanut butter lovers! This recipe is perfect for busy weeknights or family gatherings, and trust me, everyone will be coming back for seconds (or thirds!).
These cookies are not only delicious but also incredibly easy to whip up. With just a handful of simple ingredients, you’ll have a batch of warm cookies ready in no time. They’re a delightful treat that brings smiles and satisfaction to any occasion.
Why You’ll Love This Recipe
- Easy to prepare: With simple steps and common ingredients, these cookies come together quickly.
- Family-friendly appeal: Kids and adults alike will love the sweet and salty combination of peanut butter and Butterfinger.
- Make-ahead convenience: Chill the dough or freeze baked cookies; they’re perfect for prep-ahead fun!
- Delicious flavor: The blend of creamy peanut butter and crispy candy bits creates an irresistible taste experience.
Ingredients You’ll Need
You won’t believe how simple these ingredients are! Each one plays an important role in creating those wonderfully tasty Peanut Butter Butterfinger Cookies. Let’s gather what you need:
- 3/4 cup butter (softened, about 1 and 1/2 sticks)
- 1/2 cup granulated sugar
- 1/2 cup brown sugar (packed)
- 1 cup peanut butter (avoid natural varieties)
- 1 large egg
- 1 and 1/2 teaspoons vanilla extract
- 1 and 1/2 cups all-purpose flour (spooned and leveled)
- 1/2 teaspoon baking soda
- 1/2 teaspoon baking powder
- 1/4 teaspoon kosher salt
- 16 ounces Butterfinger (chopped)
Variations
This recipe is quite flexible, allowing you to get creative based on your preferences! Here are some fun ideas:
- Try different candies: Swap out Butterfinger for your favorite candy bar like Snickers or Reese’s.
- Add chocolate chips: Mix in semi-sweet or dark chocolate chips for extra chocolatey goodness.
- Make it nut-free: Use sunflower seed butter instead of peanut butter for a nut-free option that still tastes great!
- Bake as bars: Press the dough into a lined baking dish instead of making individual cookies for easy cutting.
How to Make Peanut Butter Butterfinger Cookies
Step 1: Cream the Butter and Sugars
In a large bowl or stand mixer, beat the softened butter until it’s smooth and creamy. This step is crucial because it helps to incorporate air into the batter, making your cookies light and fluffy. Scrape the sides as needed!
Step 2: Add Sugars
Next, add both granulated sugar and brown sugar to the bowl. Beat this mixture well for about two minutes until fluffy—this ensures that all those delicious flavors meld together beautifully.
Step 3: Incorporate Peanut Butter
Now it’s time to add your cup of peanut butter! I personally love using Jif because it blends so smoothly. Adding this ingredient gives our cookies that rich flavor we crave.
Step 4: Add Egg and Vanilla
Crack in one large egg along with one and a half teaspoons of vanilla extract. Beat everything together until combined. This will enhance the sweetness while helping bind our cookie dough.
Step 5: Mix Dry Ingredients
Spoon in one and a half cups of all-purpose flour without packing it down too much. Then top it with baking soda, baking powder, and kosher salt before gently stirring them together. This step combines the dry components without overmixing—key for soft cookies!
Step 6: Combine Wet and Dry Mixtures
Turn on your mixer to combine everything just until it starts coming together. Don’t worry if there’s still some flour visible; overmixing can lead to tough cookies.
Step 7: Fold in Chopped Butterfingers
Finally, fold in those wonderful chopped Butterfingers until they’re just barely incorporated into the dough. This is where all that crunchiness comes from!
Step 8: Chill the Dough
Cover your bowl with plastic wrap and chill your cookie dough for at least 15 minutes (you can go up to 24 hours). Chilling helps prevent spreading when baking—an important step!
Step 9: Preheat Your Oven
While waiting on the dough, preheat your oven to 350°F. Line two baking sheets with parchment paper or silicone mats; this ensures easy cleanup later!
Step 10: Shape Your Cookies
Using a cookie scoop or your hands, shape the chilled dough into balls about two inches wide. Arrange them on the baking sheets with enough space between each ball since they’ll spread while baking.
Step 11: Bake!
Pop those beauties into the oven for about ten minutes until their edges are set but still puffy in the center—this is prime cookie texture! If they haven’t spread much yet, gently press down on them with a spatula.
Step 12: Cool Down
After removing from the oven, let them cool on the pan for about five minutes before transferring to wire racks. I recommend waiting until they’re closer to room temperature before diving in—you’ll appreciate them even more!
And there you have it—delicious Peanut Butter Butterfinger Cookies that are sure to impress friends and family alike! Enjoy every crumb!
Pro Tips for Making Peanut Butter Butterfinger Cookies
Baking can be a delightful adventure, and these tips will help you make the most scrumptious Peanut Butter Butterfinger Cookies ever!
-
Use room temperature ingredients: Ensuring your butter and eggs are at room temperature helps create a smooth, well-mixed dough, leading to softer cookies with a perfect texture.
-
Chill the dough: Letting the cookie dough chill for at least 15 minutes (or longer) before baking allows the flavors to meld and results in thicker cookies that won’t spread too much in the oven.
-
Don’t overmix: When combining your dry ingredients with wet, mix just until incorporated. Overmixing can result in tough cookies instead of the soft and chewy texture you’re aiming for.
-
Experiment with add-ins: While Butterfinger bits are delicious, feel free to add other mix-ins like chopped peanuts or chocolate chips for an extra layer of flavor and texture.
-
Adjust baking time as needed: Every oven is different! Keep an eye on your cookies as they bake, checking for that perfect puffy edge. If they look slightly underbaked, that’s okay; they will firm up as they cool.
How to Serve Peanut Butter Butterfinger Cookies
These cookies are already a treat on their own, but presenting them in a fun way can elevate your dessert experience!
Garnishes
-
Drizzle of Chocolate: A light drizzle of melted chocolate over each cookie adds an elegant touch and extra sweetness.
-
Chopped Peanuts: Sprinkling some chopped peanuts on top gives a nice crunch that complements the soft cookie texture beautifully.
Side Dishes
-
Milk: A classic pairing! The creaminess of milk balances out the rich peanut butter flavor and sweet Butterfinger bits perfectly.
-
Coffee: The warm, bitter notes of coffee create a delicious contrast to the sweetness of the cookies, making it an ideal afternoon snack combo.
-
Ice Cream: Serve your cookies alongside a scoop of vanilla or chocolate ice cream for a decadent dessert experience that’s sure to impress.
-
Fruit Salad: A refreshing fruit salad provides a light counterpoint to the richness of the cookies, adding brightness and balance to your plate.
Enjoy these delightful Peanut Butter Butterfinger Cookies and happy baking!
Make Ahead and Storage
These Peanut Butter Butterfinger Cookies are perfect for meal prep! Whether you’re baking for a gathering or just want a sweet treat ready to go, these cookies hold up beautifully and can be made ahead of time.
Storing Leftovers
- Store cookies in an airtight container at room temperature.
- They will stay fresh for up to 3 days.
- If you prefer them a little softer, place a slice of bread in the container with the cookies.
Freezing
- To freeze cookie dough, scoop individual balls onto a baking sheet and freeze until solid.
- Transfer frozen dough balls to a ziplock bag, and they can be stored for up to 3 months.
- For baked cookies, place them in a sealed container and freeze for up to 4 weeks.
Reheating
- To reheat frozen cookie dough, bake directly from the freezer for an additional minute or two.
- For baked cookies, warm them in the microwave for about 10-15 seconds or until just warmed through.
FAQs
Here are some common questions about Peanut Butter Butterfinger Cookies that might help you out!
Can I use natural peanut butter for Peanut Butter Butterfinger Cookies?
Using natural peanut butter is not recommended as it may affect the texture and consistency of the cookies. Stick to regular peanut butter like Jif for best results!
How can I make Peanut Butter Butterfinger Cookies ahead of time?
You can prepare the dough ahead of time by chilling it in the fridge or freezing it. This way, you can bake fresh cookies whenever you’re ready!
What should I do if my Peanut Butter Butterfinger Cookies don’t spread while baking?
If your cookies don’t spread, gently press down on them with a spatula right after they come out of the oven. This helps create that perfect cookie shape!
How long do Peanut Butter Butterfinger Cookies last?
These delightful cookies will stay fresh at room temperature in an airtight container for up to 3 days.
Can I add more ingredients to my Peanut Butter Butterfinger Cookies?
Absolutely! Feel free to mix in chocolate chips or other candy bits along with the Butterfinger bits to customize your cookie experience.
Final Thoughts
I hope you’re as excited about these Peanut Butter Butterfinger Cookies as I am! They’re an absolute treat – soft, thick, and loaded with crunchy bits that make every bite special. Enjoy making this recipe; it’s sure to bring smiles all around! Don’t forget to share your cookie creations with loved ones – happy baking!
Peanut Butter Butterfinger Cookies

Indulge in the delightful taste of Peanut Butter Butterfinger Cookies, a sweet treat that combines the creamy richness of peanut butter with the crunch of Butterfinger bits. These cookies are soft, thick, and perfect for any occasion, whether it’s a family gathering or a cozy evening at home. Their simplicity and satisfying flavor will have everyone reaching for seconds. Plus, they come together in no time, making them an easy go-to recipe for dessert lovers!
- Prep Time: 15 minutes
- Cook Time: 10 minutes
- Total Time: 25 minutes
- Yield: Approximately 24 cookies 1x
- Category: Dessert
- Method: Baking
- Cuisine: American
Ingredients
- 3/4 cup softened butter (about 1 and 1/2 sticks)
- 1/2 cup granulated sugar
- 1/2 cup packed brown sugar
- 1 cup peanut butter (not natural)
- 1 large egg
- 1 and 1/2 teaspoons vanilla extract
- 1 and 1/2 cups all-purpose flour
- 1/2 teaspoon baking soda
- 1/2 teaspoon baking powder
- 1/4 teaspoon kosher salt
- 16 ounces chopped Butterfinger
Instructions
- Cream the softened butter in a large bowl until smooth.
- Add granulated sugar and brown sugar; beat until fluffy.
- Mix in peanut butter until well combined.
- Add egg and vanilla extract; beat until blended.
- Gradually mix in flour, baking soda, baking powder, and salt until just combined.
- Fold in chopped Butterfinger pieces gently.
- Chill dough for at least 15 minutes.
- Preheat oven to 350°F; line baking sheets with parchment paper.
- Scoop dough into balls about two inches wide on prepared sheets.
- Bake for about 10 minutes until edges are set but centers remain puffy.
- Cool on pans before transferring to wire racks.
Nutrition
- Serving Size: 1 cookie (30g)
- Calories: 150
- Sugar: 10g
- Sodium: 100mg
- Fat: 8g
- Saturated Fat: 4g
- Unsaturated Fat: 3g
- Trans Fat: 0g
- Carbohydrates: 18g
- Fiber: 1g
- Protein: 3g
- Cholesterol: 15mg